|
Quick Table of Contents
[Edit] Installing XAMPP
It’s possible to download Apache (the name of the web server software) and PHP individually and then set it up manually. However, its way easier to use XAMPP, a bundled package containing the software we’ll need.
To install XAMPP, we obviously need to download it first. Go to the XAMPP website, select your operating system and start downloading the basic package. XAMPP is cross-platform, so it’s available for the Mac OS, Windows, and Linux.
When your download is finished, open it.
An installation wizard will pop up when you run the executable file. You only have to specify a path (Do not install it in c) and you are good to go. Because a lot of files are being copied, this might take a while.
When it’s done copying files, a command screen will appear. It’ll ask you a few questions but most of them are just personal preferences. If you have no idea which option you should choose, just accept the default settings.
After a few questions, it’s done configuring and you’ll be asked what you want to do next.
Let’s disable HTTPS, Perl, and ASP. We are disabling them because we won’t need them. If you do want to use these later on (HTTPS is especially nice if you are developing a financial app or something that needs a secure transfer protocol), you can enable them at that point in time.
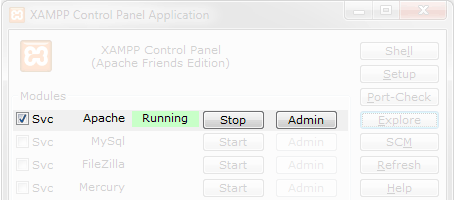
When the installation is complete, open the XAMPP Control Panel.
 This is what your XAMPP Control Panel should look like.
On the XAMPP Control Panel, click the first Start button to start the Apache software. If you don’t want to open the control panel every time you want to start Apache, press the first SVC button. Press the Exit button to close the Control Panel.
Congratulations, your web server is ready for use! Point your web browser to http://localhost, take a deep breath and keep your fingers crossed.
September 19, 2011
|
This Page is Under Construction! - If You Want To Help Please Send your CV - Advanced Web Core (BETA)
© Advanced Web Core. All rights reserved


